
Leaf Blower
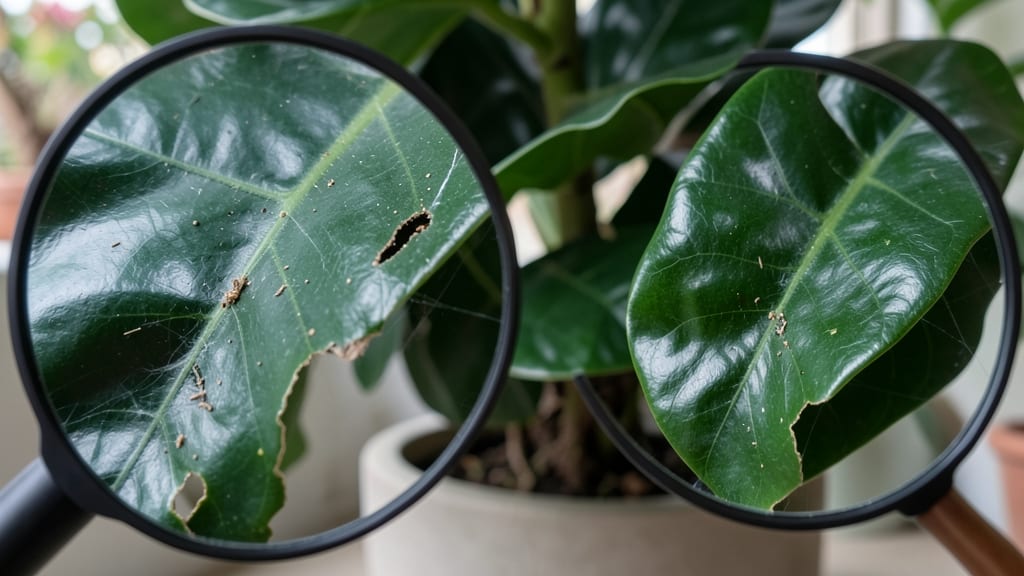
Your fiddle leaf fig’s leaves shouldn’t look like Swiss cheese. 🌿 Those holes—whether tiny specks or ragged tears—are a cry for help, and I’ve cracked the code to fix them. The first step is identifying the culprit: spider mites, thrips, or maybe even your own well-meaning (but overzealous) leaf dusting.
Most of the time, the damage comes from tiny pests hiding on the undersides of leaves. A quick inspection with a magnifying glass reveals the truth: spider mites leave fine webbing, while thrips scatter tiny black specks like confetti.
Mechanical damage? That’s usually your fingerprints—or a pet’s curious paws. Once you know the cause, the fix is straightforward: isolation, targeted sprays, and a little TLC.
Within 2-3 weeks of treatment, you’ll see new growth pushing through, glossy and hole-free. The leaves will regain their signature deep green, and those droopy stems will perk up like they’ve had an espresso.
The key is consistency—don’t stop after one round of sprays, and adjust your care routine to keep pests from crashing the party again.
This works for every fiddle leaf fig, whether it’s a sunbathing showstopper or a neglected corner survivor. The same principles apply to your money tree or rubber plant too—once you master the basics, your whole houseplant collection will thank you. Let’s get those leaves back to their best.
Root Causes of Leaf Damage
Fiddle leaf figs (Ficus lyrata) are stunning houseplants, but those mysterious holes in their leaves can be a real head-scratcher. 🕵️♂️ Understanding the why behind the damage is the first step to saving your plant.
Below, we break down the most common culprits—backed by science—and explain how they create those unsightly holes.
---
Pests are the #1 reason for holes in fiddle leaf fig leaves. These tiny invaders don’t just nibble—they devour your plant’s foliage, leaving behind telltale signs like:
- Swiss cheese-like holes (common with spider mites and thrips). - Serrated edges (a hallmark of caterpillars or slugs). - Fine webbing (spider mites spin silk to trap moisture).
How it happens: - Spider mites (Tetranychus urticae) use their needle-like mouthparts to pierce cells, sucking out sap and creating stippled damage that progresses to holes. - Caterpillars (like looper or cutworm larvae) chew irregular, jagged holes, often leaving behind frass (tiny black droppings). - Slugs and snails (yes, even indoors!) leave behind slime trails and large, ragged holes, especially in humid conditions.
Pro tip: 🔍 Check the undersides of leaves first—pests love to hide there!
---
While less common than pests, fungal or bacterial infections can weaken leaves, making them vulnerable to tearing—or even causing them to develop holes as the disease progresses.
How it happens: - Anthracnose (Colletotrichum spp.) starts as dark, sunken spots that expand, killing tissue and leaving holes. Overwatering or poor air circulation speeds up the spread. - Bacterial leaf spot (Pseudomonas or Xanthomonas) causes water-soaked lesions that turn yellow or brown, eventually collapsing into holes. - Powdery mildew (though it usually looks like white dust) can distort leaf growth, making them brittle and prone to tearing.
Key clue: Look for yellowing around holes or a foul odor—a sign of decay.
---
Not all holes are caused by living creatures. Mechanical stress can tear leaves, creating holes that mimic pest damage.
How it happens: - Rough handling (e.g., dragging the plant, bumping into furniture) can snag leaves, especially the delicate, lobed edges of fiddle leaf figs. - Wind or drafts (even from AC vents or ceiling fans) can cause leaves to flap against surfaces, creating abrasions. - Overly tight pots or roots pressing against containers can distort leaf growth, making them weak and prone to tearing.
Pro tip: 🌡️ If holes appear only on newer leaves or have smooth, clean edges, physical damage is likely the culprit.
---
Extreme conditions can weaken fiddle leaf figs, making their leaves thin, brittle, and hole-prone.
How it happens: - Low humidity causes leaves to dry out, losing structural integrity. The edges curl and crack, leading to holes. - Temperature fluctuations (e.g., drafts from windows or heaters) stress the plant, slowing cell repair and making leaves more susceptible to damage. - Over-fertilization (especially with high salt content) burns leaf tissue, creating necrotic spots that expand into holes.
Key sign: Holes paired with yellowing, browning, or crispy leaf edges point to environmental stress.
--- Next steps? Once you’ve identified the cause, we’ll show you how to treat the problem and prevent future damage—so your fiddle leaf fig can bounce back stronger than ever! 🌿✨
Fixing and Reviving Your Fiddle Leaf Fig
Now that you know the causes behind those pesky holes in your fiddle leaf fig, let’s roll up our sleeves and get your plant back to its lush, healthy glory! 🌿✨ Whether it’s pests, disease, or environmental stress, these solutions are simple, effective, and tailored to bring your plant back to life.
Prevention tips are sprinkled throughout—because once you’ve got it fixed, you’ll want to keep it thriving!
---
If tiny critters like spider mites, mealybugs, or scale insects are the culprits, act fast before they spread.
#### 🔥 Step 1: Isolate and Inspect - Move your fiddle leaf fig away from other plants to prevent cross-contamination. - Use a magnifying glass to confirm the type of pest—look for webbing (spider mites), cottony residue (mealybugs), or hard bumps (scale).
#### 🍳 Step 2: Manual Removal (For Mealybugs & Scale) - Dip a cotton swab in rubbing alcohol (70% isopropyl) and gently dab each pest. The alcohol kills them on contact. - For stubborn scale, use a soft toothbrush to scrape them off before applying alcohol.
#### 👨🍳 Step 3: Natural Sprays (Safe & Effective) Mix one of these in a spray bottle and apply thoroughly to both sides of leaves: - Neem Oil Solution: 1 tsp neem oil + 1 tsp mild dish soap + 1 quart water.
Shake well and spray until dripping. - Soap Spray: 1 tbsp castile soap + 1 quart water. Test on a small leaf first to avoid burning. - Horticultural Oil: Follow package instructions for coverage.
#### 🥘 Step 4: Repeat & Monitor - Spray every 3–5 days for 2–3 weeks to break the pest life cycle. - Wipe leaves with a damp cloth to remove residue and improve airflow.
💡 Pro Tip: Place a sticky trap near your plant to catch flying pests like fungus gnats. Empty and replace it weekly!
---
If your fiddle leaf fig’s roots are soggy, it’s time to dry things out and give it fresh air.
#### ✂️ Step 1: Remove the Plant from Its Pot - Gently tip the pot and slide the plant out. Shake off excess soil to inspect the roots.
#### 🔪 Step 2: Trim the Damage - Use sterilized scissors to cut away any black, mushy, or smelly roots. - Healthy roots are firm and white or light tan.
#### 🌱 Step 3: Repot with Fresh Soil - Choose a well-draining pot (one size up from the old one). - Use a light, airy potting mix (cactus/succulent mix works well). - Add a 1-inch layer of perlite or orchid bark at the bottom for drainage.
#### 💧 Step 4: Adjust Your Watering Habits - Wait until the top 2 inches of soil are dry before watering again. - Water thoroughly but less often—your plant prefers drought to soggy roots. - Ensure the pot has drainage holes and never sits in standing water.
🎯 Prevention Tip: Stick your finger in the soil—if it’s damp past 1 inch, hold off on watering!
---
If holes or damage are due to sunburn, drafts, or temperature swings, tweak your plant’s surroundings.
#### 🌞 Step 1: Optimize Light Exposure - Move your fiddle leaf fig to bright, indirect light (east or north-facing windows are ideal). - Avoid direct afternoon sun, which can scorch leaves. - If leaves are pale or crispy, it’s getting too much sun.
If they’re dark and leggy, it needs more light.
#### 🌬️ Step 2: Shield from Drafts & AC - Keep your plant away from vents, doors, and air conditioners. - If you must use a fan for circulation, ensure it’s not blowing directly on the leaves.
#### 🌡️ Step 3: Maintain Ideal Temperature & Humidity - Temperature: Keep it between 65–80°F (18–27°C).
Avoid cold drafts from windows in winter. - Humidity: If your home is dry (common with AC or heat), mist leaves 2–3 times a week or use a pebble tray. - Humidifier Hack: Place the tray under the pot with water and pebbles—never let the pot sit in water.
✨ Bonus Tip: Wipe leaves with a damp microfiber cloth monthly to remove dust and help them absorb light better!
---
If holes or spots are from anthracnose, bacterial blight, or powdery mildew, act quickly to prevent spread.
#### 🧼 Step 1: Prune Infected Areas - Cut off any holes, spots, or yellowing leaves with sterilized scissors. - Dispose of infected leaves in the trash (not compost).
#### 💊 Step 2: Apply Fungicide - Use a copper-based fungicide or baking soda spray (1 tsp baking soda + 1 quart water + a drop of soap). - Spray both sides of leaves and the soil surface. - Repeat every 7–10 days until new growth appears.
#### 🌿 Step 3: Boost Airflow & Light - Space plants apart to improve air circulation. - Ensure bright, indirect light (fungus loves dark, damp conditions). - Avoid overhead watering—water at the base instead.
🔥 Pro Tip: Quarantine new plants for 2–4 weeks before introducing them to your collection to prevent infections!
---
Once you’ve addressed the root cause (pun intended), give your fiddle leaf fig some extra TLC to recover.
#### 🍃 Step 1: Fertilize Lightly - Use a balanced, water-soluble fertilizer (like 10-10-10) diluted to half strength. - Fertilize every 4–6 weeks in spring/summer—skip in fall/winter.
#### 🌿 Step 2: Encourage New Growth - Rotate the pot quarter-turn weekly so all sides get even light. - If leaves are drooping, trim back leggy stems to encourage bushier growth.
#### 💧 Step 3: Monitor & Adjust - Keep a plant journal to track watering, light, and response. - If new holes appear, reassess the cause—sometimes issues reappear if conditions aren’t fully fixed.
🎯 Final Prevention Checklist: ✅ Water wisely (dry topsoil test). ✅ Inspect leaves weekly for pests or spots. ✅ Keep humidity stable (pebble trays or humidifier). ✅ Avoid extreme temps/drafts. ✅ Clean leaves regularly to prevent pest hideouts.
--- With these steps, your fiddle leaf fig should bounce back stronger than ever! 🌟 Remember, consistency is key—plants, like people, thrive on routine care. Now go give your green buddy the love it deserves!
Frequently asked questions
Can I save my fiddle leaf fig if the holes are already large and spreading?
Yes, but act fast! Trim away severely damaged leaves with sterilized scissors and focus on treating the underlying cause—whether it's pests, disease, or environmental stress. Healthy new growth will emerge within 4-6 weeks if you address root issues like overwatering or pest infestations.
How do I tell if holes are from pests vs. physical damage?
Check the leaf edges and undersides: pest damage often has fine webbing (spider mites) or tiny black specks (thrips). Physical damage usually has clean, jagged edges without residue. Also, pests leave holes that progress over time, while tears from handling appear suddenly.
Will my fiddle leaf fig grow back with holes in the leaves?
Fiddle leaf figs are resilient. The plant will produce new leaves that are hole-free as long as you fix the underlying problem. Focus on balanced light, proper watering, and pest control—new growth will emerge within 2-3 months with proper care.
Are there any commercial products that work better than homemade sprays?
For stubborn infestations, horticultural oils or insecticidal soaps (like Safer® Brand) are more concentrated than DIY mixes. Always test on a small area first and follow label instructions. For severe cases, consider systemic treatments like imidacloprid (for indoor use only).
My fiddle leaf fig has holes but no other symptoms—what should I do?
Start with basic prevention: wipe leaves with a damp cloth to remove dust (which attracts pests), check soil moisture, and ensure proper light. If no pests appear after 2 weeks, the damage was likely mechanical. Rotate the plant weekly to prevent future stress.