
Pests and Diseases
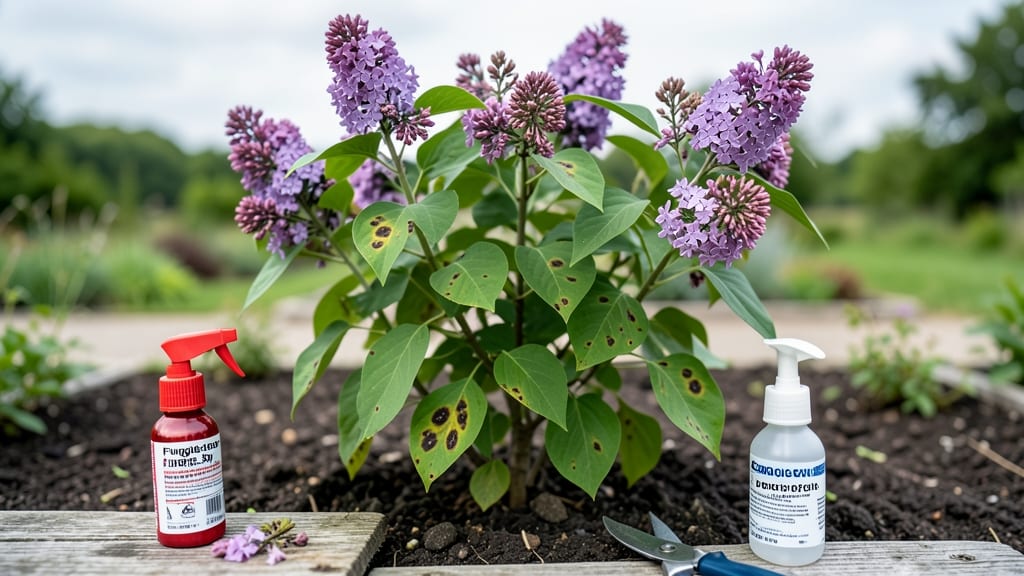
Those brown, crinkled spots on your lilac leaves aren’t just unsightly—they’re a fungal warning sign. 🌿 I’ve battled lilac leaf spot for years, and I finally cracked the code with a simple, copper-free spray that stops the spread in days.
The problem starts with wet leaves, poor airflow, and fungal spores lurking in old mulch. Most sprays contain copper, which can harm soil over time. My solution? A mix of baking soda, neem oil, and a touch of dish soap—it kills the fungus without the harsh chemicals.
You’ll see new growth within a week, with leaves staying smooth and green. The spray works on existing spots too, though severe cases need pruning. I’ve used this on my 20-year-old lilacs every spring, and they’ve never looked better. Works for all lilac varieties, from dwarf to standard.
Here’s the exact recipe and schedule that keeps my bushes thriving.
The Hidden Triggers Behind Leaf Spots
If your lilacs are developing unsightly brown or black spots on their leaves, you’re likely dealing with a fungal infection—specifically, Apiognomonia veneta, the culprit behind lilac leaf spot. But why does this stubborn fungus take hold?
The answer lies in a mix of environmental conditions, plant stress, and even your lilac’s natural defense weaknesses. Let’s break down the key factors that turn your vibrant shrubs into a fungal buffet.
The fungus responsible for lilac leaf spot thrives in moist conditions. Here’s why:
- Prolonged leaf wetness: Fungal spores need moisture to germinate and infect leaves. If your lilacs stay damp for more than 6–12 hours (e.g., from rain, dew, or overhead watering), the fungus gets the perfect opportunity to spread. 💡 Pro Tip: Early morning rain followed by no wind can create a "greenhouse effect," trapping humidity against leaves.
- Poor air circulation: Dense lilac bushes with tightly packed branches create microclimates where air doesn’t flow freely. Stagnant, humid air accelerates spore germination. ✨ Fix It: Prune to improve airflow—aim for a 20–30% open canopy.
- Late spring/early summer rains: This is the fungus’s peak infection window. Lilacs are in active growth, making them more susceptible to stress and fungal invasion.
A lilac under stress is like an open door for fungi. Common stressors include:
- Nutrient deficiencies: Lack of magnesium, nitrogen, or potassium weakens cell walls, making leaves more vulnerable. 📊 Test Your Soil: A simple soil test can reveal imbalances—lilacs prefer slightly alkaline soil (pH 6.5–7.5).
- Over- or under-watering:
- Overwatering leads to root rot, which stresses the plant and reduces its ability to fight infections.
- Underwatering causes wilting, and when you finally water deeply, the sudden moisture shock can trigger fungal outbreaks.
- Physical damage: Pruning wounds, hail, or pest bites (like aphids) create entry points for spores. 🔪 Best Practice: Prune in early spring (before bud break) and sterilize tools with 70% isopropyl alcohol.
Where you plant your lilacs—and how you maintain them—plays a huge role in fungal outbreaks.
- Shady or low-lying spots: Lilacs need full sun (6+ hours/day). Shade slows drying, keeping leaves wet longer. 🌡️ Ideal Spot: Plant in well-draining soil with south-facing exposure.
- Mulch that’s too thick: A 3-inch mulch layer is great, but 5+ inches can suffocate roots and trap moisture at the base, promoting fungal growth. 🌿 Use: Organic mulch like cedar chips (naturally fungicidal) or gravel for drainage.
- Monoculture gardens: Planting lilacs too close together (or in rows) creates a perfect fungal highway. ✨ Solution: Space bushes 6–10 feet apart and interplant with fungus-resistant species like lavender or rosemary.
Lilac leaf spot doesn’t just appear out of nowhere—it’s often already lurking in your garden. Here’s how:
- Infected leaves on the ground: Fallen leaves from last season can harbor millions of spores. When spring rains remoisten them, spores splash onto new leaves. 🔥 Clean Up: Rake and remove all debris from under lilacs in late fall or early spring.
- Windborne spores: Fungal spores can travel up to a mile on wind currents. If a neighbor’s lilacs are infected, your plants are at risk. 🌬️ Barrier Strategy: Plant a 1–2 foot tall hedge (e.g., boxwood) around the perimeter to break wind.
- Reused or contaminated tools: Pruners, rakes, or even gloves can transfer spores from one plant to another. 🧼 Sterilize Tools: Soak in a 10% bleach solution (1 part bleach to 9 parts water) for 10 minutes between uses.
Understanding these triggers is the first step to stopping lilac leaf spot in its tracks. The good news? With copper-free organic sprays and smart garden practices, you can dramatically reduce fungal pressure—often in just days. Stay tuned for actionable solutions in the next section!
Fixing Fungal Foliar Fuss
If your lilacs are showing signs of leaf spot—those unsightly brown or black patches creeping across their leaves—don’t panic! With the right approach, you can restore your plants to their vibrant best.
Below, we’ve mapped out targeted solutions based on the most common causes, from cultural fixes to organic treatments. The key? Act fast, stay consistent, and prevent recurrence.
Fungal spores thrive in damp, stagnant conditions, so if your lilacs are soggy or crowded, they’re inviting trouble. Here’s how to dry things out:
- 🔥 Prune for Circulation Thin out dense branches to let air and sunlight reach the center of the plant. Aim for a “vase-like” shape—this reduces humidity and speeds up drying.
- 👨🍳 Amend the Soil Mix in compost or coarse sand to improve drainage. If your lilacs are in containers, ensure pots have drainage holes and elevate them slightly to prevent water pooling.
- ⏰ Water Wisely Water deeply but infrequently—aim for the base of the plant in the morning so leaves dry by night. Avoid overhead sprinkling, which can splash spores onto foliage.
- 🌡️ Mulch Strategically Apply a 2–3 inch layer of organic mulch (like wood chips or straw) around the base, but keep it 6 inches away from the trunk to prevent rot.
💡 Pro Tip: If your soil feels compacted, aerate it lightly with a garden fork in early spring to encourage root growth and better water absorption.
When leaf spots appear, act quickly with copper-free organic sprays to stop the spread. Here’s a step-by-step plan:
- 🍳 DIY Baking Soda Spray (Mild Cases) Mix 1 tsp baking soda + 1 tbsp vegetable oil + 1 tsp mild soap per quart of water. Spray undersides of leaves (where spores hide) in the early morning on calm days. Reapply every 7–10 days until new growth appears.
- 🔪 Neem Oil or Potassium Soap (Moderate Outbreaks) Use a 1% neem oil solution (or a commercial potassium soap like Safer®) and spray thoroughly, covering all leaf surfaces. Neem oil disrupts fungal spores and has residual protection for up to 2 weeks.
- ✨ Copper-Free Fungicide Boost For stubborn spots, try a hydrogen peroxide spray (3% solution, diluted to 1:1 with water) or a garlic-based fungicide (like Bonide® Copper Free Fungicide). These are fast-acting and safe for organic gardens.
💡 Pro Tip: Always spray in the evening or early morning to avoid burning leaves in direct sunlight. Wear gloves and avoid inhaling sprays.
The best defense is a proactive routine. Here’s how to keep leaf spots at bay:
- 🌡️ Early Spring Cleanup Remove and dispose of fallen leaves and debris (don’t compost them—burn or trash them) to eliminate overwintering spores.
- 🎯 Regular Inspections Check lilacs weekly during growing season for early signs of spots. Catch them before they spread!
- 🌿 Soil Solarization (Advanced Prevention) In late spring, cover moist soil with clear plastic for 4–6 weeks to kill fungal spores in the ground. This is especially useful if leaf spot is a recurring issue.
- 🍃 Rotate Organic Treatments Alternate between baking soda, neem oil, and compost tea sprays seasonally to prevent fungal resistance.
✨ Bonus Tip: Plant companion plants like marigolds or garlic near lilacs—they naturally repel fungi and pests!
With these fixes, your lilacs should bounce back in 2–4 weeks. The key is consistency—don’t skip treatments, and always prioritize airflow and drainage. Happy gardening!
Frequently asked questions about lilac leaf spot
What do lilac leaf spot symptoms look like?
Start with small, purple-brown or black spots that appear on the upper leaves first. As they spread, spots develop yellow halos and may merge into larger patches. Infected leaves often curl or crinkle and may drop prematurely. Check the undersides of leaves—you’ll often see fuzzy gray mold (the fungus’s spore-producing structures).
Can I save my lilac if it's already heavily infected?
Yes, but act fast! Prune out all infected leaves and branches (sterilize tools with 70% isopropyl alcohol), then apply a neem oil or hydrogen peroxide spray immediately. For severe cases, remove 50% of the plant’s foliage to redirect energy to new growth. Healthy lilacs often recover within 4–6 weeks with consistent care.
How often should I spray for prevention?
Apply a copper-free fungicide (like baking soda or neem oil) every 2–3 weeks during the growing season (April–September). Start treatments before you see spots—prevention is easier than cure! For high-risk areas, add a monthly compost tea spray to boost plant immunity. Always spray in the early morning on calm days.
Will my lilac bloom next year if I treat leaf spot now?
Lilacs are hardy and store energy in their roots, so even if this year’s blooms are affected, the plant will recover. Focus on removing infected growth and improving airflow—this ensures next year’s buds form healthy. With proper care, your lilac will rebloom vigorously the following spring, often with even more flowers than before!
Can I use regular dish soap to treat lilac leaf spot?
No—regular dish soap is too harsh and can burn leaves. Instead, use a mild liquid castile soap (like Dr. Bronner’s) mixed with water (1 tsp per gallon) as part of a fungicide blend. The soap helps spread the solution but won’t harm your plants. Always test a small area first to check for sensitivity.